

We will be using the Apache log file for the analysis. But the location of the file in Debian systems is /var/log/apache2/access.log if you would like to follow along with your own file. Consult your Linux distribution documentation for the location of access.log in other systems.
Cyber Security Threat Hunting
Threat hunting is the practice of proactively searching for cyber threats that are lurking undetected in a network. Cyber threat hunting digs deep to find malicious actors in your environment that have slipped past your initial endpoint security defenses. After sneaking in, an attacker can stealthily remain in a network for months as they quietly collect data, look for confidential material, or obtain login credentials that will allow them to move laterally across the environment.
Once an adversary is successful in evading detection and an attack has penetrated an organization’s defenses, many organizations lack the sophisticated detection capabilities they need to stop the advanced persistent threats from remaining in the network. That’s why threat hunting is an essential component of any cyber security defense strategy.
Extracting Threat Information from the Apache Access Log
We are given an Apache HTTP server log, which contains evidence of an attack. Our task is to use Bash commands to inspect the file and discover who the attackers were and exactly what happened on the server.
1.Print a list of potential attackers (Figure 1):
cat access.log |cut -d “ “ -f 1 |sort -u
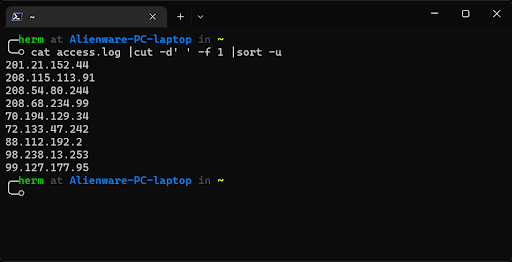
Figure 1: Extracting a list of potential attackers.
Less than ten IP addresses were recorded in the log file. Next, we use uniq and sort to show unique lines, further refine our output, and sort the data by the number of times each IP address accessed the server. Use the -c option of uniq to have the number of occurrences prefix the output line.
2. Print the number of log entries for each IP (Figure 2).
cat access.log |cut -d “ ” -f 1 |sort |uniq -c |sort -urn
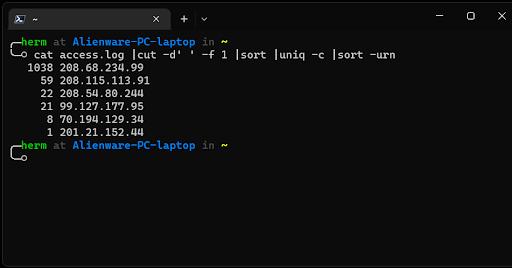
Figure 2: Printing the number of log entries for each IP.
Red flag! 208.68.234.99.
Other IP addresses stand out, but we will focus on the address that has the highest access frequency first. To filter out the 208.68.234.99 address and display and count the resources that were being requested by that IP, we can use the following sequence:
3. What resource was that IP requesting (Figure 3)?
cat access.log | grep ‘208.68.234.99’ | cut -d “”” -f 2 | uniq -c
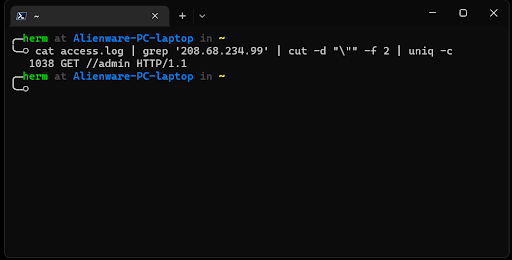
Figure 3: What resource was the attacker after?
4. From this output, it seems that the IP address at 208.68.234.99 was accessing the /admin directory exclusively. Let’s inspect this further (Figure 4).
cat access.log | grep ‘208.68.234.99’ | grep ‘/admin ‘ | sort -u
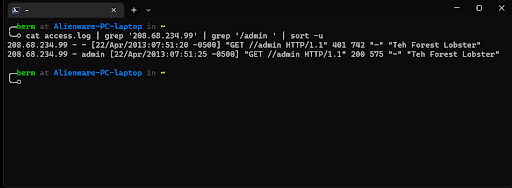
Figure 4: Timeline Reconstructed
Conclusion
208.68.234.99 has been involved in an HTTP brute force attempt against this webserver. Furthermore, after about 1000 attempts, it seems like the brute force attempt succeeded, as indicated by the “HTTP 200” message. We have identified the attacker, the attack methodology, and the time at which the attack was successful in four easy steps!
Keep reading

Penetration Testing for the Cyber Resilience Act
The Cyber Resilience Act (CRA) is introducing a new standard of accountability for all products with digital elements entering the EU market.

Penetration Testing Protects Modern Enterprises: A Conversation With Victor Westbrook
Cyber threats aren’t just escalating, they’re industrializing.

Penetration Testing for IoT Medical Devices at Winmill
Introduction A global medical equipment manufacturer faced growing scrutiny from prospective customers to demonstrate the security of its connected products.